
Correction Is the Step That Makes Protection Work
Ceramic coating doesn't hide defects — it locks them in. A coating amplifies every swirl and scratch underneath it. So we do the work in the right order: find the defects, correct the paint, prepare every panel properly, and only then apply protection.
The Order of Operations
Four Steps, and They Don't Get Skipped
Defects
We find what's actually in the paint before we touch it.
Correction
We remove the defects — we don't cover them up.
Panel Preparation
Bare, residue-free paint the coating can bond to.
Protection
We seal in a finish that finally looks like it should.
01 — Defects
What's Actually in Your Paint
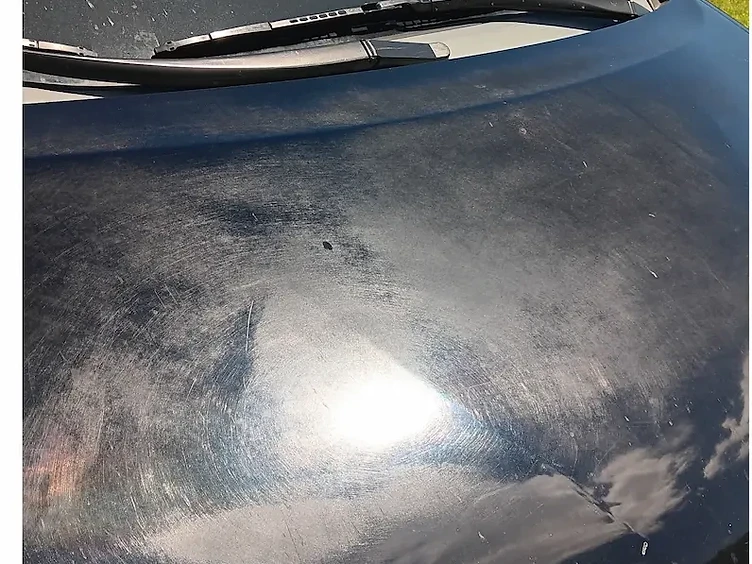
Under proper inspection lighting, almost every daily-driven vehicle has defects you can't see in the driveway. Before we quote anything, we inspect the paint panel by panel and measure clear coat thickness — so we know exactly how much we can safely remove.
Swirl Marks & Spider Webbing
Fine circular scratches left by washing and drying. They scatter light instead of reflecting it, which is why the paint looks dull and hazy in the sun.
Oxidation & Fading
UV and weather break down the clear coat over time, leaving the paint chalky, flat, and lighter than it was when it left the factory.
Water Spots & Mineral Etching
Hard water and sprinklers leave minerals behind that etch into the clear coat. Light spotting polishes out — deep etching does not.
Bird Droppings & Bug Etching
Acidic contamination etches permanently once it sits. This is the damage we see most often that owners assume will wash off.
Holograms & Buffer Trails
A 3D-looking haze left behind by poor machine polishing. Invisible in the shade, obvious the moment sunlight hits the panel.
Scratches, Scuffs & Bonded Contamination
From keys, branches, shopping carts, and automatic car washes — plus embedded tar, iron fallout, and road film that washing won't remove.
Not sure what you're looking at? Send us a few photos of your paint in direct sunlight and we'll tell you what we see and what it would take to correct it.
02 — Correction
Removing Defects, Not Hiding Them
Correction is machine polishing. Done properly, it levels the clear coat by a microscopic amount so the surface reflects light evenly again — that's what actually removes swirl marks. There's no glaze, filler, or wax in this step, so nothing "comes back" two washes later.
Single-Stage Enhancement
One polishing step to remove light defects and bring back real gloss on paint that's already in decent shape. This is what most newer vehicles actually need.
Best for: Newer vehicles and paint with light marring
Multi-Stage Correction
Two or more steps: a cutting stage to remove deeper defects, then refining stages to bring the finish up to a mirror gloss with no haze left behind.
Best for: Neglected, heavily swirled, or oxidized paint
We Measure Before We Polish
Every correction removes a small amount of clear coat, and there's only so much to work with. We check paint thickness first and only remove what's safe. If your paint can't take the correction you're hoping for, we'll tell you that before we start — not after.
03 — Panel Preparation
The Step Most Shops Skip
Correction leaves oils and dust behind. A coating won't bond to either. This is the least visible part of the job and the one that decides whether your protection lasts the full term or fails in the first year.
Why it matters: coating over polishing oils doesn't just shorten the coating's life — it can leave streaking and patchy gloss that never cures evenly.
- 01
Full Decontamination
Iron and fallout remover, tar removal, and a clay treatment to strip away bonded contamination that washing leaves behind.
- 02
Blow-Out and Detailing
Compressed air clears polishing dust and moisture out of seams, badges, grilles, panel gaps, and mirror housings.
- 03
Panel Wipe
An alcohol-based panel-prep wipe removes the polishing oils and residue left by correction — the invisible layer a coating can't bond through.
- 04
Masking Trim, Glass and Rubber
Tape goes down so coating never lands on plastic trim, weather stripping, or glass edges. Clean lines are a prep decision, not a finishing touch.
- 05
Final Inspection Under LED
Every panel gets re-checked with an inspection light for missed defects, dust, or residue before protection is applied.
04 — Protection
Locking In the Result
Corrected and prepped paint is as clean, bare, and defect-free as it will ever be. That's the exact moment to protect it — and the only moment a coating can bond the way it's designed to.
Coating Uncorrected Paint
You pay for five years of protection and lock in five years of swirl marks. The extra gloss makes every defect more obvious, not less — and fixing it later means polishing the coating right off.
Protection on Corrected Paint
The coating seals in the correction, so the gloss you see on pickup day is the gloss you keep. This is the combination our 5-Year Nano Pro Ceramic Coating is built for.
Questions
Paint Correction FAQs
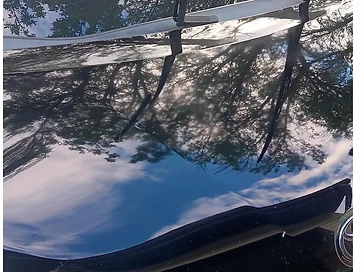
Real Paint Correction Results
See the difference proper paint correction can make. This vehicle had visible swirls and defects that significantly reduced the clarity and gloss of the finish.


Certified Installation • La Crosse Area
Get Your Protection Quote
Send us your vehicle details and a few photos. We'll review them and come back with recommended options and pricing — so you know exactly what your paint needs before you commit.